


Welcome to the User Management guide for Webdashboard. As an administrator (PortalAdmin), you can easily manage all portal users, assign roles, enforce security policies (such as MFA), organize workspace access, and export audit logs—all from one centralized dashboard.
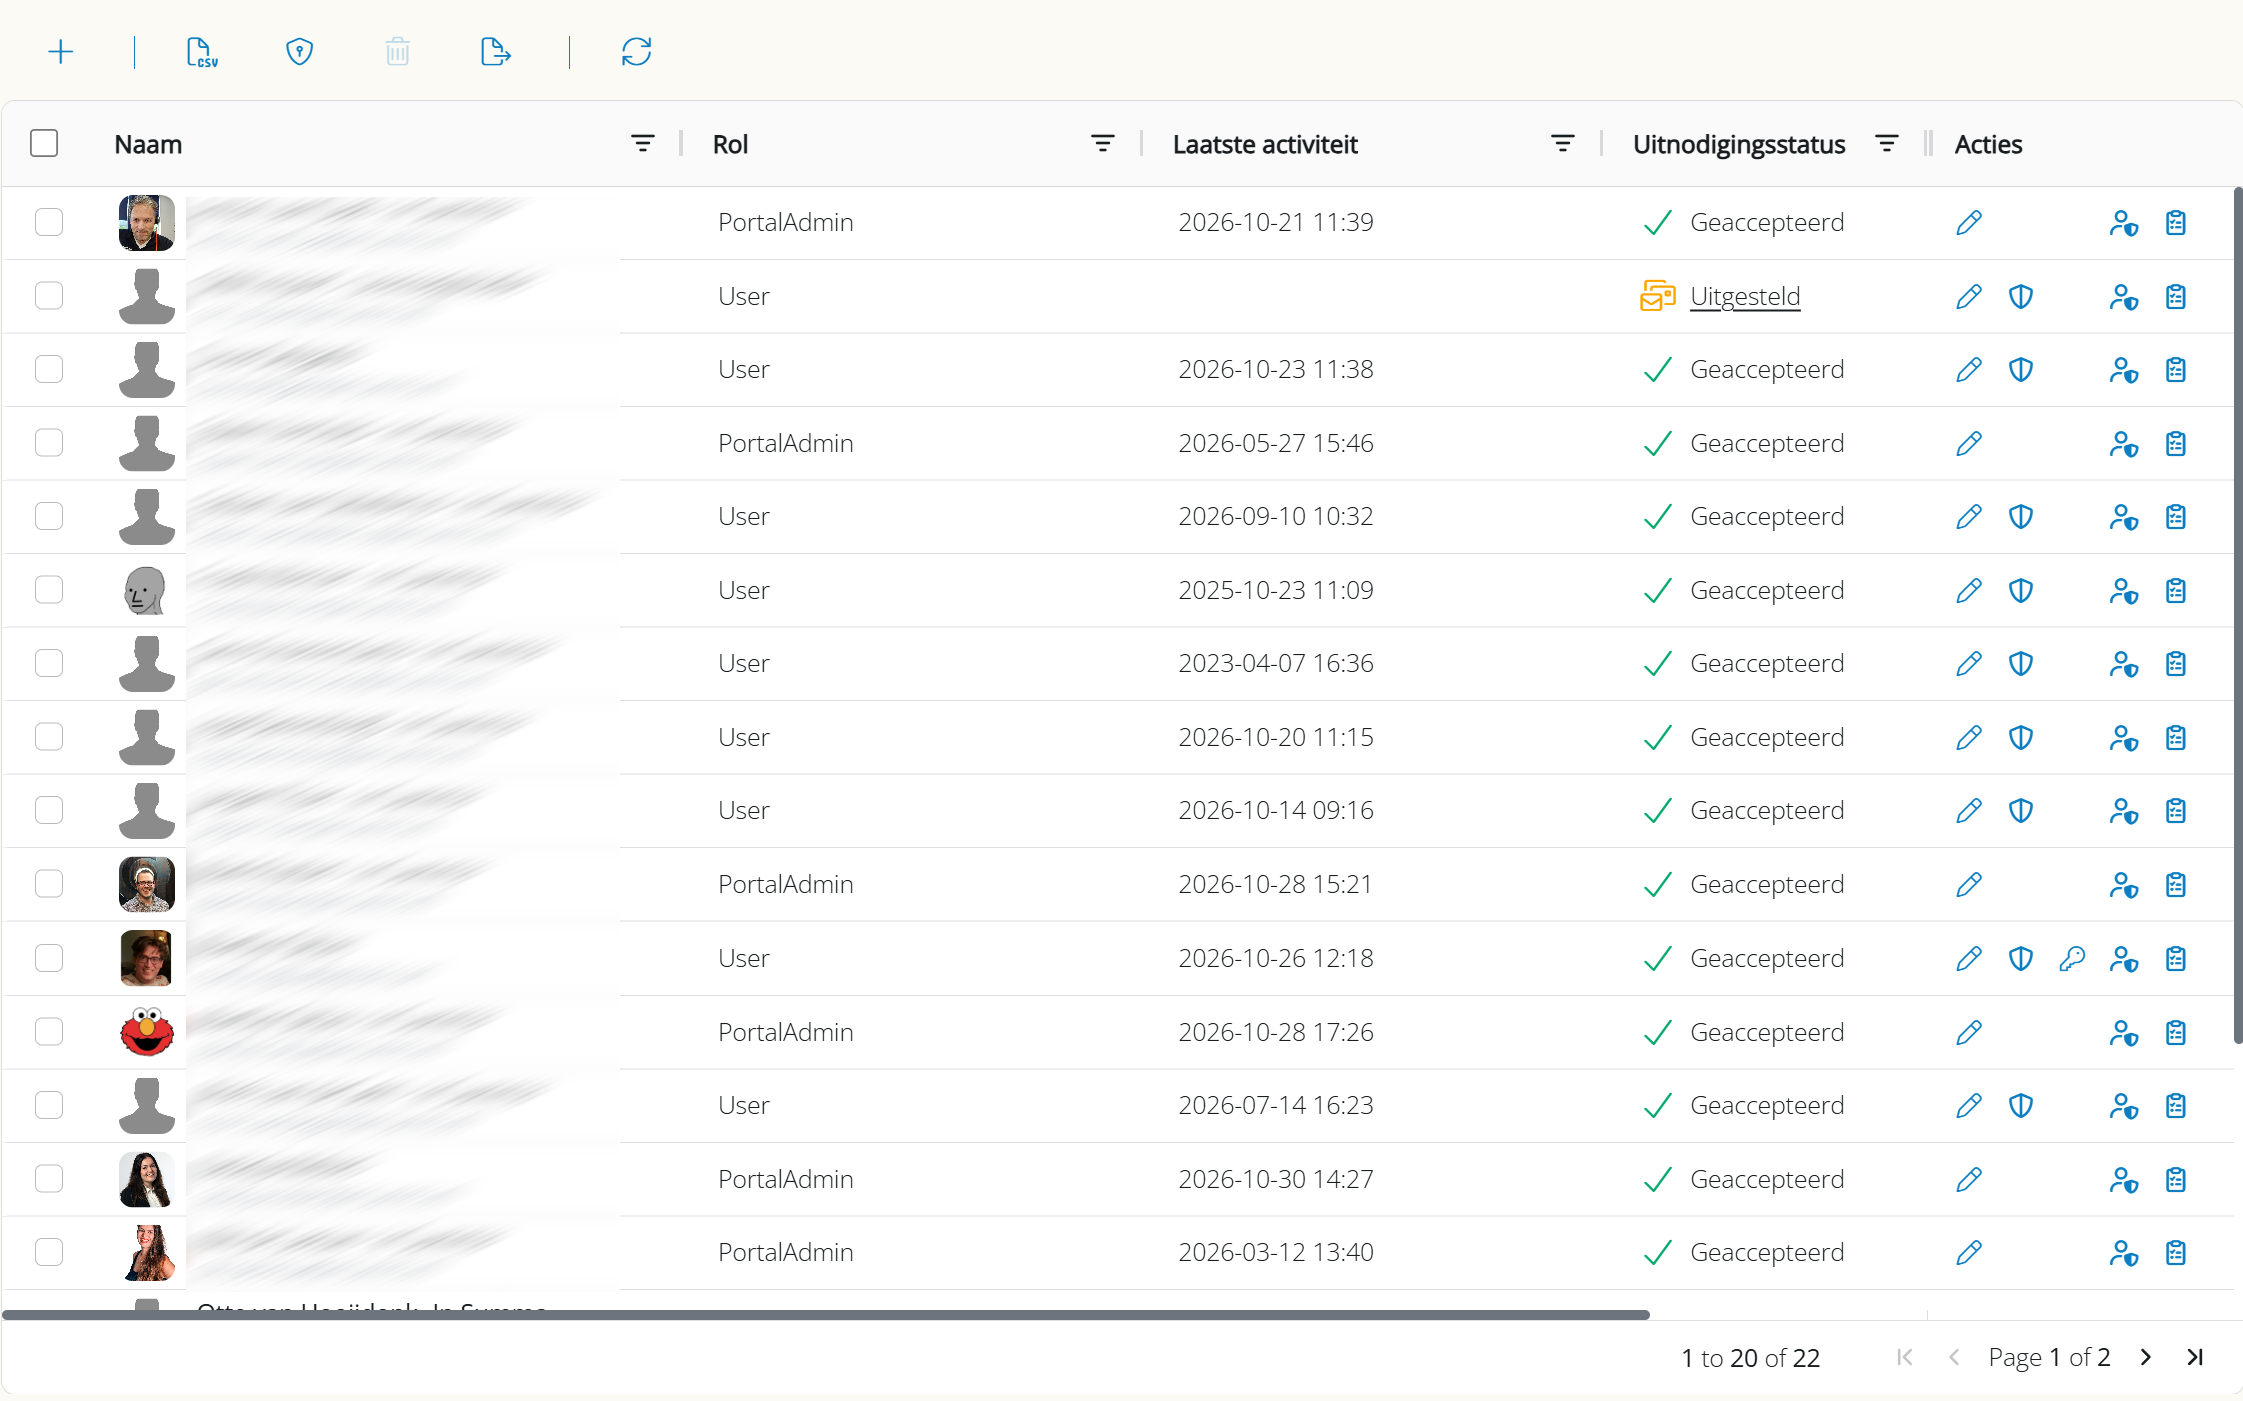
1. Navigating the User Overview
The modern user grid provides an instant overview of all user accounts registered to your portal.
Columns & Indicators
Name & Email: The user's full name, profile picture (avatar), and primary email address.
Role: The authorization level assigned to the user:
PortalAdmin: Full administrative control over the portal, workspace settings, reports, and user access.
User Management: End-user that can also manage users.
Workspace Admin: End-user that can also manage access to specific workspace(s).
User: End-user with access strictly to the workspaces and reports granted to them.
Last Activity: The timestamp showing when the user last logged in or actively engaged with the portal.
Invitation Status:
✔ Accepted: The user has activated their account and has full access.
✉ Deferred: The account has been created, but the invitation email was intentionally held back (ideal when staging accounts in bulk).
✉ Sent: The invitation email has been dispatched, but the user has not completed their activation yet.
Actions: Quick-action icons for immediate profile editing, MFA toggles, password resets, authorization inspection, and audit logs.
TIP
Sorting & Filtering: Click the filter icon next to any column header (Name, Role, Last Activity, Invitation Status) to quickly filter down to specific teams, unaccepted invitations, or inactive accounts.
2. Adding a New User
Click the + (Add User) button located in the top-left toolbar.
Depending on your portal configuration, you have 3 options:
A. Local User
Enter the user's Full Name and Email Address.
Select the assigned Role (User or PortalAdmin).
Specify whether MFA (Multi-Factor Authentication) is mandatory for this account.
(Optional) Toggle Deferred Invitation if you want to prepare the user profile in advance without notifying the user immediately.
B. Federated User (Microsoft Entra ID / Google Workspace)
If your portal is integrated with an identity provider via Single Sign-On (SSO):
Choose Add Federated User from the dropdown menu.
Select the appropriate user from your connected organization directory.
Assign their initial role and default workspace permissions.
3. Bulk Actions: Managing Multiple Users at Scale
To perform actions on multiple users at once, check the selection boxes on the left-hand side of individual rows (or click the top-left header checkbox to select all visible users).
Once selected, the bulk action icons in the toolbar become active:
4. Editing User Profiles & Security (Slide-in Drawer)
Click the Pencil icon in the Actions column (or click on any user row) to open the Slide-in Detail Drawer. This panel is organized into dedicated tabs:
👤 Profile Tab
Password Reset: Trigger an instant password reset link sent to the user's registered email.
Role Assignment: Switch between User and PortalAdmin.
MFA Toggle: Enforce or revoke two-factor authentication for this individual account.
Personal Landing Page: Override the default portal start page with a specific workspace or dashboard tailored to this user.
Language & Timezone: Adjust the interface language (e.g., Dutch or English) and localized timezone preferences.
🔐 Security & Permissions Tab (Workspace & Group Security)
Inspect all workspaces and individual reports the user has direct access to.
Identify inherited permissions granted through internal security groups or federated external groups.
📋 Audit Trail Tab
Review a complete history of the user's sign-ins, role changes, and administrative modifications for compliance audits.
5. Resending Invitations (Resend Invite)
If a user missed their onboarding email or their activation link has expired:
Locate the user in the overview grid.
Open their detail drawer or click Resend Invite from the actions menu.
A fresh invitation email with a new activation link will be sent immediately.
6. Exporting Data for Audits & Compliance
Click the Export icon (document with an arrow) in the top toolbar to download critical administrative reports to Excel or CSV:
User Overview: Complete list of all accounts, assigned roles, creation dates, and current invitation statuses.
Workspace Access Overview: A full authorization matrix detailing who has access to which workspaces and datasets (essential for security and ISO/NEN audits).
Report Views (Past 25 Months): In-depth activity logging showing which reports were viewed by each user over the past 25 months—invaluable for adoption tracking and license management.